
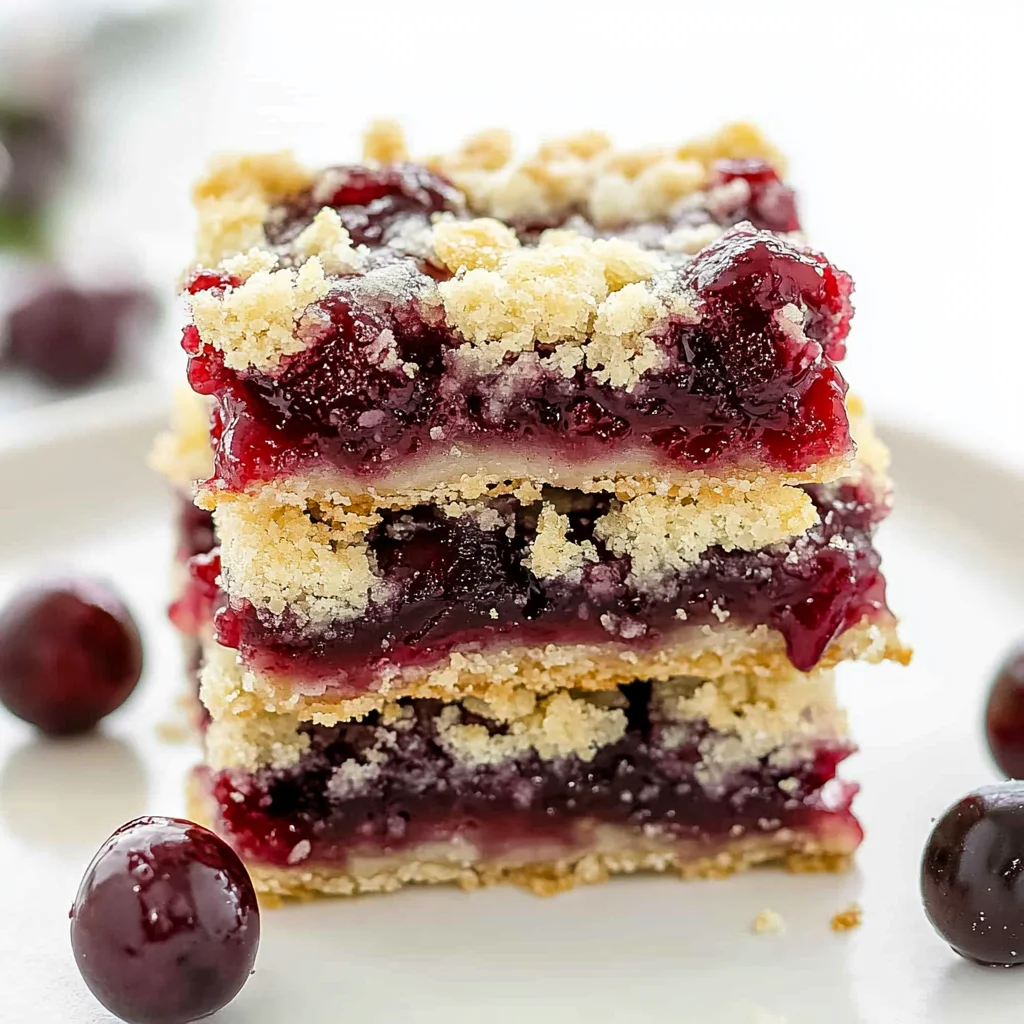
Imagine biting into a warm cherry pie bar, where the buttery crust crumbles delicately in your mouth, and the sweet-tart cherry filling bursts with flavor, releasing a heavenly aroma that dances through the air. These cherry pie bars are not just dessert; they’re a nostalgic trip down memory lane, perfect for summer picnics or cozy family gatherings where laughter and good food collide.
I still remember the first time I baked these delightful treats with my grandmother, her mischievous smile lighting up the kitchen as we rolled out the dough and stirred the luscious cherry filling. Whether it’s a holiday celebration or simply an afternoon craving for something sweet, these cherry pie bars promise to deliver an unforgettable flavor experience that will have everyone coming back for seconds.
Why Does Everyone Love cherry pie bars?
Delightful flavor comes from a buttery crust that perfectly complements the sweet cherry filling. Quick prep time of just 15 minutes means you can whip these up in no time! Versatile enough for any occasion, they’re a hit at parties or just a cozy family dessert. Easy to make, even novice bakers will shine with this simple recipe. Plus, they’re perfect for using fresh or frozen cherries, making them a year-round favorite!
cherry pie bars Ingredients
For the Crust
- 1 cup unsalted butter (softened) – A rich, creamy base that creates a buttery texture for your cherry pie bars.
- 1/2 cup granulated sugar – Adds just the right amount of sweetness to balance the buttery flavor.
- 2 cups all-purpose flour – Provides structure and a tender crumb to your crust.
- 1/4 teaspoon salt – Enhances the sweetness and brings out the flavors of the other ingredients.
- 1 teaspoon vanilla extract – Infuses a warm, aromatic essence that complements the cherries beautifully.
For the Filling
- 2 cups fresh or frozen cherries (pitted and halved) – The star ingredient that delivers a sweet and tart burst in every bite.
- 1/2 cup granulated sugar – Balances the tartness of cherries for a delightful filling.
- 1 tablespoon cornstarch – Thickens the filling, ensuring it stays perfectly gooey without being runny.
- 1 tablespoon lemon juice – Brightens up the cherry flavor and adds a refreshing zing.
- 1/2 teaspoon almond extract (optional) – Adds an extra layer of depth to the filling’s flavor profile.
How to Make cherry pie bars

1. Preheat the oven to 350°F (175°C). Grease the baking pan with a little butter or cooking spray to ensure easy removal later on.
2. Cream together 1 cup of softened unsalted butter and 1/2 cup of granulated sugar in a mixing bowl until the mixture is light and fluffy, about 3-5 minutes.
3. Combine 2 cups of all-purpose flour and 1/4 teaspoon of salt into the butter mixture. Mix until just combined, then press two-thirds of this crust mixture into the bottom of your prepared baking pan.
For the Filling:
4. Mix together 2 cups of pitted and halved fresh or frozen cherries, 1/2 cup of granulated sugar, 1 tablespoon of cornstarch, 1 tablespoon of lemon juice, and optional 1/2 teaspoon of almond extract in another bowl until well blended.
5. Spread the cherry mixture evenly over the crust in the baking pan, making sure every bite gets that delicious cherry goodness.
6. Crumble the remaining crust mixture over the cherry filling, creating a beautiful topping that will turn golden as it bakes.
7. Bake in your preheated oven for about 30 minutes or until the top is golden brown and fragrant, filling your kitchen with an irresistible aroma.
8. Cool completely before cutting into bars, allowing the flavors to meld beautifully while you wait for that perfect slice.
Optional: Dust with powdered sugar before serving for an elegant touch!
Exact quantities are listed in the recipe card below.
Tips for the Best cherry pie bars
- Butter Temperature: Use softened butter for a light and fluffy crust; cold butter can result in a dense texture.
- Proper Mixing: Avoid overmixing the flour; this can lead to tough crusts. Mix until just combined for tender cherry pie bars.
- Cherry Prep: Ensure cherries are pitted and halved properly; skipping this step can lead to unpleasant bites and a messy filling.
- Cornstarch Care: Don’t skip the cornstarch! It thickens the filling, preventing it from being runny.
- Cool Completely: Allow the bars to cool fully before cutting; warm bars might crumble and lose their shape.
- Golden Top: Keep an eye on baking time; if the top isn’t golden brown, they need more time to achieve that perfect finish.
How to Store and Freeze cherry pie bars
- Room Temperature: Keep your cherry pie bars in an airtight container for up to 3 days to maintain their delightful flavor and texture.
- Fridge: For longer freshness, store the bars in the fridge for up to a week. Just ensure they are well-wrapped to prevent them from drying out.
- Freezer: Freeze individual slices of cherry pie bars in plastic wrap and then place them in a freezer-safe bag for up to 3 months. Thaw overnight in the fridge when ready to enjoy.
- Reheating: To warm, simply pop the bars in a preheated oven at 350°F (175°C) for about 10 minutes, or microwave for 15-20 seconds until just heated through.
cherry pie bars Your Way
Feel free to let your creativity shine by customizing these delightful treats to suit your taste buds!
- Gluten-Free: Substitute all-purpose flour with a 1:1 gluten-free blend for a deliciously inclusive dessert. You’ll still enjoy that tender crust, making every bite a joy.
- Brown Sugar: Swap granulated sugar for brown sugar in the crust for a deeper, caramel-like flavor. This adds a lovely richness that perfectly complements the tart cherries.
- Coconut Oil: Replace unsalted butter with melted coconut oil for a dairy-free version. It lends a subtle coconut flavor that pairs beautifully with the cherries.
- Nutty Crust: Incorporate ground almonds or walnuts into the crust for added texture and flavor. This nutty twist brings an unexpected crunch that elevates each slice.
- Spiced Version: Add 1 teaspoon of cinnamon or nutmeg to the crust mixture for warm, aromatic notes. These spices create a cozy vibe that’s perfect for any occasion.
- Extra Vanilla: Increase the vanilla extract to 2 teaspoons in the crust for an intensified flavor profile. A little extra vanilla always enhances the sweetness of the filling.
- Zesty Kick: Incorporate lemon zest into your filling for an extra layer of brightness. This twist amplifies the flavors and makes every bite feel refreshing.
Make Ahead Options

Making cherry pie bars is perfect for meal prep, allowing you to enjoy a delightful dessert any day of the week. You can prepare the crust by creaming together 1 cup of softened unsalted butter and 1/2 cup of granulated sugar, then mixing in 2 cups of all-purpose flour, 1/4 teaspoon of salt, and 1 teaspoon of vanilla extract. This crust can be made up to 24 hours in advance and stored in the refrigerator. For the filling, combine 2 cups of fresh or frozen pitted cherries with 1/2 cup of granulated sugar, 1 tablespoon of cornstarch, 1 tablespoon of lemon juice, and optionally, 1/2 teaspoon of almond extract. This mixture can also be prepped ahead and kept in the fridge for up to 3 days. When you’re ready to serve your cherry pie bars, simply spread the filling over the prepared crust, crumble the remaining crust mixture on top, bake for about 30 minutes until golden brown, and allow it to cool completely before cutting into bars. Enjoy the sweet convenience!
cherry pie bars Recipe FAQs
What kind of cherries should I use for the filling?
You can use either fresh or frozen cherries for your cherry pie bars. If using fresh cherries, make sure they are ripe and sweet for the best flavor. Frozen cherries work beautifully too; just ensure they are pitted and halved before mixing them with the sugar and cornstarch.
How should I store leftover cherry pie bars?
To keep your cherry pie bars fresh, store them in an airtight container at room temperature for up to three days. If you need to keep them longer, refrigerate them, where they will last about a week. Just be sure to allow them to come to room temperature before serving for optimal flavor.
Can I freeze cherry pie bars?
Absolutely! To freeze your cherry pie bars, wrap them tightly in plastic wrap and then place them in a freezer-safe container. They can be stored for up to three months. When you’re ready to enjoy, simply thaw them in the refrigerator overnight or let them sit at room temperature for a few hours.
What if my crust is too crumbly?
If you find that your crust mixture is too crumbly and doesn’t hold together well, try adding a tablespoon of cold water or milk at a time until it binds better. You want it to be moist enough to press into the pan but not so wet that it becomes sticky.
How many servings does this recipe yield?
This recipe yields around four generous servings of delicious cherry pie bars, making it perfect for a small gathering or family dessert. Each serving contains about 250 calories, so you can enjoy this sweet treat without too much guilt!
Can I make this recipe gluten-free?
Yes! To make gluten-free cherry pie bars, simply swap out the all-purpose flour with a high-quality gluten-free flour blend. Ensure that all other ingredients are certified gluten-free as well, especially if you’re sensitive to cross-contamination.
Cherry Pie Bars
Ingredients
Method
- Preheat the oven to 350°F (175°C). Grease the baking pan.
- In a mixing bowl, cream together the softened butter and sugar until light and fluffy.
- Add the flour and salt, mixing until just combined. Press two-thirds of the mixture into the bottom of the prepared baking pan.
- In another bowl, combine the cherries, sugar, cornstarch, lemon juice, and almond extract. Stir until well mixed.
- Spread the cherry mixture evenly over the crust in the baking pan.
- Crumble the remaining crust mixture over the cherry filling.
- Bake in the preheated oven for 30 minutes or until the top is golden brown.
- Allow to cool completely before cutting into bars.